

Table of Contents
- What You'll Need Before You Start Painting
- The Essential Tools for Miniature Painting
- The Best Primer for Resin Miniatures
- Step-by-Step: How to Paint Resin D&D Miniatures
- Can You Use Watercolours on Miniatures?
- Common Mistakes When You Paint Resin Miniatures
- Sealing and Varnishing Your Finished Miniature
- Frequently Asked Questions
Last Updated: September 27, 2026
What You'll Need Before You Start Painting
To paint resin miniatures well, patience matters before paint does. If you learn how to paint resin D&D miniatures properly, the first hour matters more than the last. Every resin model arrives unpainted and needs a wash and a prime before a brush goes near it. Skip that stage and paint flakes off within weeks.
Gather these first:
- Warm water, mild washing-up liquid and a soft toothbrush
- A hobby knife and fine sandpaper or needle files
- Primer made for plastics and resin
- A wet palette, a size 0 and size 2 brush
- Acrylic paints, a shade wash and a matt varnish
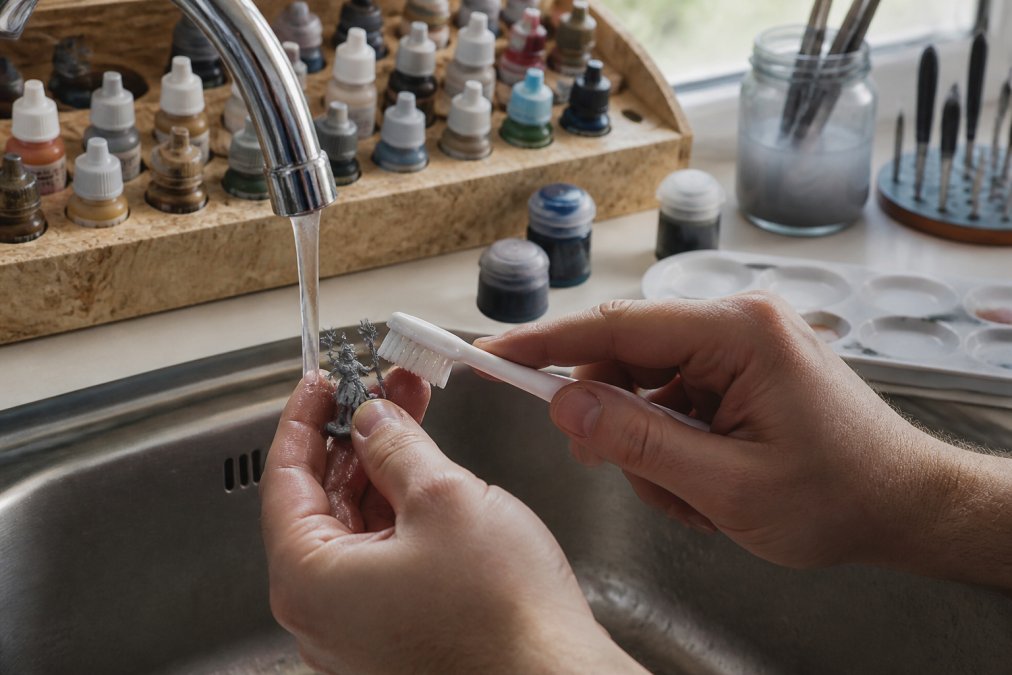
Cleaning and Prepping Your Resin Miniature
Resin parts carry mould release agent from the casting process. Paint will not grip that film, so wash the model in warm soapy water and scrub gently with a toothbrush. Rinse, then let it dry fully.
Next, trim the sprue nubs and any flash with a sharp knife. Sand the cut points smooth. A common mistake is rushing this step, then wondering why the primer beads up in patches.
Once the model is clean and dry, mount it on a cork or a painting handle. This keeps your fingers off the surface and stops oils from your skin spoiling the primer coat.
The Essential Tools for Miniature Painting
The essential tools for miniature painting are a fine brush, a wet palette, good light and a primer suited to resin. You do not need a huge kit to get a tabletop-ready result.
Here is what actually earns its place:
- Brushes: a size 0 for detail, a size 2 for base coats, and one cheap brush for drybrushing
- Wet palette: keeps acrylics workable for hours instead of minutes
- Daylight lamp: shows true colours, unlike a warm desk bulb
- Painting handle: improves control and protects the model
- Water pot and kitchen roll: for rinsing and wicking excess water
What most guides miss is that brush care matters more than brush count. Clean your bristles with soap after every session and they will hold a point for months.
The Best Primer for Resin Miniatures
The best primer for resin miniatures is a thin, matt acrylic primer in a light grey or white, applied in two or three light passes rather than one heavy coat. Light primer makes colours read brighter and helps you spot missed detail.
Spray primers work well outdoors or in a well-ventilated space. Keep the can 20 to 30 cm from the model and sweep across it in short bursts. Humidity and cold both spoil the finish, so pick a dry, mild day.
Brush-on primer suits anyone without outdoor space. Apply it thinly and let each coat dry before adding the next. Two thin coats beat one thick one every time.
Whichever you choose, the goal is a smooth, even surface that still shows every detail of the sculpt. Clogged detail means you have primed too heavily.
Step-by-Step: How to Paint Resin D&D Miniatures
Painting follows a simple order: base colours, then shading, then highlights, then finishing. Work from large areas to small ones, and from dark tones to light ones. This sequence is what separates a flat model from one that looks alive on the table.
Blocking In Base Colours
Blocking in means covering each area with its main colour. Thin your paint to a milk-like consistency and apply two thin coats rather than one thick one.
Start with the largest areas, such as skin, cloth and armour. Leave the small details, eyes and metal trim for later. If you make a mistake, let it dry and paint over it.
This stage looks rough. That is normal. Base coats are the foundation, not the finished look.
Shading, Layering and Drybrushing
Shading adds depth. Flow a thinned wash into the recesses and let it settle. It pools in the folds and darkens them naturally.
Dungeons & Dragons Ape Miniature →
Layering builds up lighter tones on the raised areas. Thin your paint and apply several transparent layers, each slightly lighter than the last. Patience here pays off.
Drybrushing is the fast option. Load a dry brush with paint, wipe most of it off on kitchen roll, then drag it lightly across the raised detail. It catches edges and creates instant highlights.
Can You Use Watercolours on Miniatures?
Yes, you can use watercolours on miniatures, but only as a finishing effect rather than a base coat. Watercolour is transparent and re-wets easily, so it will not cover a model on its own.
Where watercolour shines is shading and tinting. A thin watercolour glaze over a sealed acrylic base adds subtle colour shifts that are hard to get with acrylics alone.
The catch is durability. Watercolour never fully sets on a handled model, so you must seal it with a varnish once it dries. Without that layer, a single touch will lift the colour.
Beginners should stick with acrylics for the main work and treat watercolour as an optional extra. Once your base is solid, a watercolour glaze can add a nice wash of tone to cloth or skin.
Common Mistakes When You Paint Resin Miniatures
Most ruined models fail for the same handful of reasons. Avoid these and your results improve straight away.
- Skipping the wash: leftover release agent makes paint slide off
- Priming too thick: detail vanishes under a heavy coat
- Painting straight from the pot: unthinned paint hides detail and dries lumpy
- Rushing the base coats: one thick layer looks streaky and uneven
- Handling the model bare-handed: skin oils lift paint over time
A common mistake is judging the model mid-process. Base coats and washes look messy before highlights bring everything together. Finish the job before you decide it has gone wrong.
Sealing and Varnishing Your Finished Miniature
Varnish protects the paint from fingers, dice and table knocks. A matt varnish suits most models, while a gloss varnish works for gems and wet effects.
Apply varnish in thin coats, exactly as you did the primer. Two light passes give better protection than one heavy spray. Let each coat dry fully before the next.
Once sealed, your miniature is ready for the table. Store it in a foam-lined case to stop chips between sessions.
If you would rather start from a clean, detailed sculpt, Borishotch Industries offers resin miniatures that take primer and paint well. The Dungeons & Dragons Ape Miniature is a solid first project, and the Dungeons & Dragons Barbarian Cat Miniature gives you fine detail to practise layering on. Both arrive unpainted and ready to prime.


Painting resin takes patience, but the process is straightforward once you know the order. Wash, prime, block in, shade, highlight, seal. That is the whole method, and it works on any model in your collection. If you want a sculpt worth the effort, browse the Borishotch Industries range of resin miniatures, where detailed models arrive ready for primer and paint. Order over £50 and postage is free on UK orders, and bulk buys earn automatic discounts of 5% off £50, 10% off £100 and 15% off £150. Get started with Borishotch Industries and put a fully painted warband on the table.
Frequently Asked Questions
Do you need to prime resin miniatures before painting?
Yes. Resin has a smooth surface that most acrylic paints struggle to grip, so an unprimed model will shed paint at the slightest touch. A thin coat of primer gives the paint something to bond to and helps you spot mould lines and bubbles before you commit to colour. Spray primer works well, but brush-on primer is safer indoors and gives you more control over thin or delicate parts. Two light passes beat one heavy coat every time.
Can you use watercolours on miniatures?
You can, but they behave very differently from acrylics. Watercolours stay re-wettable, so a damp finger or a spilled drink can lift the colour straight off the model. They also dry with a translucent, washed-out look that suits paper rather than a 32mm resin figure. If you want that soft, blended effect, use thinned acrylics or inks instead, which cure hard and hold up to handling during a game.
What is the best type of paint for resin D&D figures?
Water-based acrylics made for miniatures are the safest and most practical choice. They thin easily with water, dry quickly, and clean up without solvents. Look for paints labelled for plastic or resin models rather than craft acrylics, which are thicker and coarser. A small set of base colours, a wash or two and a metallic will cover most monsters. Add a matt varnish at the end to protect the finish through repeated handling.
How do you clean resin miniatures before painting?
Wash the parts in warm water with a drop of mild washing-up liquid and use an old toothbrush to work into the crevices. Resin often carries mould release agent from the casting process, and paint will not stick to it. Rinse thoroughly, then let the model air-dry completely, ideally overnight. Once dry, scrape away any mould lines with a hobby knife and fill small bubbles with a little modelling putty before you prime.